Archive:Mastodon features explained/de: Difference between revisions
(Created page with "Im Textfeld kannst du schreiben was du willst, solange du dich an die Regeln deiner Instanz und das Zeichenlimit (500) hältst.<br> Im rechten unteren Eck kannst du sehen, wie viele Zeichen du noch übrig hast.<br> Auf dem Bildschirmfoto hier im Wiki ist das Zeichenlimit 5000, da es auf einer Instanz aufgenommen wurde, wo das Zeichenlimit modifiziert wurde.") |
(Updating to match new version of source page) |
||
| (6 intermediate revisions by 2 users not shown) | |||
| Line 1: | Line 1: | ||
<languages/> | <languages/> | ||
{{Outdated |text=This article explains features of an old version of Mastodon and needs to be updated.}} | |||
[[File:Mastodon screenshot.png|thumb|x400px|''Screenshot von Mastodon's einfacher Benutzeroberfläche'']] | [[File:Mastodon screenshot.png|thumb|x400px|''Screenshot von Mastodon's einfacher Benutzeroberfläche'']] | ||
Gehen wir durch alle Mastodon Features. | Gehen wir durch alle Mastodon Features. | ||
| Line 9: | Line 10: | ||
Alles was du jetzt noch brauchst ist eine funktionierende Email Adresse und ein Passwort. | Alles was du jetzt noch brauchst ist eine funktionierende Email Adresse und ein Passwort. | ||
<span id="Profile_name"></span> | |||
==Profilname== | ==Profilname== | ||
| Line 15: | Line 17: | ||
Du kannst dir später einen anderslautenden [[#Displayname 2|Displaynamen]] aussuchen. | Du kannst dir später einen anderslautenden [[#Displayname 2|Displaynamen]] aussuchen. | ||
<span id="Email_address"></span> | |||
==Email Adresse== | ==Email Adresse== | ||
Gib eine Email Adresse ein zu der du Zugang hast und vergiss nicht welche Adresse du für den Account verwendet hast. | Gib eine Email Adresse ein zu der du Zugang hast und vergiss nicht welche Adresse du für den Account verwendet hast. | ||
<span id="Password"></span> | |||
==Passwort== | ==Passwort== | ||
| Line 24: | Line 28: | ||
Du musst das Passwort zweimal eingeben. Damit wird sichergestellt, dass kein Typo drinnen ist. | Du musst das Passwort zweimal eingeben. Damit wird sichergestellt, dass kein Typo drinnen ist. | ||
<span id="Server_rules"></span> | |||
==Server Regeln== | ==Server Regeln== | ||
| Line 29: | Line 34: | ||
Also sei dir auch sicher, dass die Regeln ausreichen um einen guten Umgang zu gewährleisten. | Also sei dir auch sicher, dass die Regeln ausreichen um einen guten Umgang zu gewährleisten. | ||
<span id="Confirmation_email"></span> | |||
==Bestätigungsmail== | ==Bestätigungsmail== | ||
| Line 39: | Line 45: | ||
Als ersts wirst du das [[#Standard Benutzeroberfläche|Standard Benutzeroberfläche]] und die Folgeempfehlungen sehen. | Als ersts wirst du das [[#Standard Benutzeroberfläche|Standard Benutzeroberfläche]] und die Folgeempfehlungen sehen. | ||
<span id="Follow_suggestions"></span> | |||
==Folgeempfehlungen== | ==Folgeempfehlungen== | ||
| Line 47: | Line 54: | ||
Wenn du später mehr Folgeempfehlungen sehen willst, kannst du im URL Feld einfach am Ende "/web/start" eingeben. | Wenn du später mehr Folgeempfehlungen sehen willst, kannst du im URL Feld einfach am Ende "/web/start" eingeben. | ||
<span id="Basic_interface"></span> | |||
= Standard Benutzeroberfläche = | = Standard Benutzeroberfläche = | ||
| Line 77: | Line 85: | ||
</div> | </div> | ||
<span id="Mentions"></span> | |||
===Erwähnungen=== | ===Erwähnungen=== | ||
| Line 92: | Line 101: | ||
</div> | </div> | ||
<span id="Attachments"></span> | |||
==Anhänge== | ==Anhänge== | ||
| Line 113: | Line 123: | ||
</div> | </div> | ||
<span id="Visibility"></span> | |||
===Sichtbarkeit=== | ===Sichtbarkeit=== | ||
| Line 126: | Line 137: | ||
</div> | </div> | ||
<span id="Content_Warnings"></span> | |||
===Inhaltswarnungen=== | ===Inhaltswarnungen=== | ||
| Line 135: | Line 147: | ||
</div> | </div> | ||
<span id="Search"></span> | |||
==Suche== | ==Suche== | ||
| Line 143: | Line 156: | ||
</div> | </div> | ||
<span id="Announcements"></span> | |||
==Ankündigungen== | ==Ankündigungen== | ||
| Line 151: | Line 165: | ||
</div> | </div> | ||
<span id="Home_timeline_settings"></span> | |||
==Home Zeitleisten Einstellungen== | ==Home Zeitleisten Einstellungen== | ||
| Line 158: | Line 173: | ||
</div> | </div> | ||
<span id="Home_timeline"></span> | |||
==Home Zeitleiste== | ==Home Zeitleiste== | ||
| Line 165: | Line 181: | ||
</div> | </div> | ||
<span id="Posts_in_a_timeline"></span> | |||
==Posts in einer Zeitleiste== | ==Posts in einer Zeitleiste== | ||
| Line 1,089: | Line 1,106: | ||
</div> | </div> | ||
{{Category |category=Mastodon}} {{ | <span id="Further_Reading"></span> | ||
=Weiterlesen= | |||
* {{Internal link |target=Mastodon features explained |link-name=Mastodon Features erklärt}} | |||
* {{Internal link |target=Scheduling and analytic tools for Mastodon |link-name=Postvorbereitungs- und Analysetools für Mastodon}} | |||
{{Getting started links}} | |||
{{Category |category=Mastodon}} {{category |category=Beginners guides}} | |||
{{Navbar/Mastodon}} | |||
Revision as of 20:17, 14 February 2024
This article explains features of an old version of Mastodon and needs to be updated. |
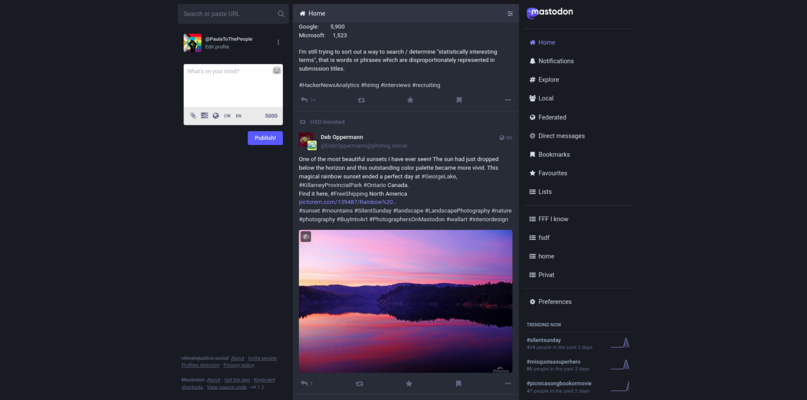
Gehen wir durch alle Mastodon Features.
Für einen Account registrieren
Du hast dich also entschieden einen Mastodon Account aufzumachen und hast auch schon die richtige Instanz dafür gefunden.
Alles was du jetzt noch brauchst ist eine funktionierende Email Adresse und ein Passwort.
Profilname
Such dir einen Profilnamen aus. Dieser wird Teil deines Handle, unter dem du im Fediverse auffindbar bist, sein.
Im Beispiel vom Screenshot ist den Profilname PaulaToThePeople und der Handle ist dann @PaulaToThePeople@climatejustice.social.
Du kannst dir später einen anderslautenden Displaynamen aussuchen.
Email Adresse
Gib eine Email Adresse ein zu der du Zugang hast und vergiss nicht welche Adresse du für den Account verwendet hast.
Passwort
Benutze ein starkes Passwort, am besten eines, das generiert wurde und in einem Passwort Manager wie KeePass gespeichert wird.
Du musst das Passwort zweimal eingeben. Damit wird sichergestellt, dass kein Typo drinnen ist.
Server Regeln
Um einen Account anzulegen, musst du den Server Regeln zustimmen. Lies diese genau durch. Du wirst sie befolgen müssen, genau wie andere Nutzer*innen auf der Instanz.
Also sei dir auch sicher, dass die Regeln ausreichen um einen guten Umgang zu gewährleisten.
Bestätigungsmail
Nachdem du auf "Registrieren" geklickt hast wirst du eine Bestätigungsmail zugesandt bekommen. Darin befindet sich ein Link den du anklicken musst um deine Email Adresse zu bestätigen und deinen Account freizuschalten.
Schau in deinem Spam Ordner nach, wenn du die Email nicht bekommst.
Wie Mastodon für neue Nutzer*innen aussieht
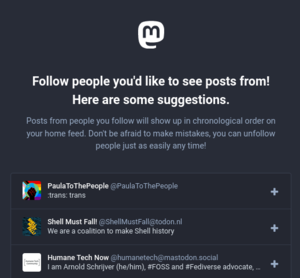
Als ersts wirst du das Standard Benutzeroberfläche und die Folgeempfehlungen sehen.
Folgeempfehlungen
Die Folgeempfehlungen basieren darauf, wen Leute auf deiner Instanz folgen.
Du kannst jemenschen folgen, indem du auf das + Symbol klickst. Oder schau dir das Profil zuerst an indem du auf den Nutzer*innennamen klickst.
Wenn du die Folgeempfehlungen ausblenden willst, dann klicke einfach auf "Fertig".
Wenn du später mehr Folgeempfehlungen sehen willst, kannst du im URL Feld einfach am Ende "/web/start" eingeben.
Standard Benutzeroberfläche
Die Standard Benutzeroberfläche erwartet dich, wenn du neu bei Mastodon bist. Du kannst zur fortgeschrittenen Benutzeroberfläche in den Einstellungen wechseln.
Wir werden jetzt alle Funktionen der standard Benutzeroberfläche besprechen.
Toots
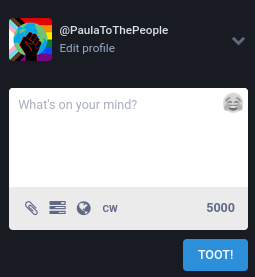
Bei Mastodon heißen Posts Toots, oder auch Tröts genannt.
Text
Im Textfeld kannst du schreiben was du willst, solange du dich an die Regeln deiner Instanz und das Zeichenlimit (500) hältst.
Im rechten unteren Eck kannst du sehen, wie viele Zeichen du noch übrig hast.
Auf dem Bildschirmfoto hier im Wiki ist das Zeichenlimit 5000, da es auf einer Instanz aufgenommen wurde, wo das Zeichenlimit modifiziert wurde.
Emojis
Click on the laughing emoji in the top right of the text field to add emojis.
Besides all the known emojis instance admins can add custom emojis. You can request new custom emojis by contacting your instance admin.
Hashtags
Adding hashtags is simple. Just put the # character right before the word.
So e.g. #FridaysForFuture.
Erwähnungen
To mention someone enter @ followed by their profile name (not the display name). If you have already interacted with the user they will be suggested to you when you start entering the profile name.
When you want to mention a user that you haven't discovered yet, you have to enter the full handle (@profilename@instance.domain).
Links
Of course you can also add links to your toots. Simply paste the url into the text field.
You need to past the whole url, including the https:// so the link will be clickable.
Don't worry about adding long urls, they will not use up as much characters as they actually have.
Anhänge
Click on the paperclip symbol to add an attachment. You can add up to 4 pictures, a video or an audio file.
When you add a picture or video you can mark it as sensitive, so it will be blurred and people have to click on it to see the unblurred version.
You can only add an attachment or a poll to a toot - not both.
Media Beschreibungen
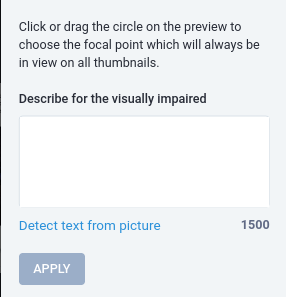
Click on the edit button to add a media description. You usually have 1500 characters for your description, so more than for the toot itself.
Polls
Click on the 3 bars besides the paperclip to add a poll. You can add up to 4 poll options or more if the Mastodon instance is modified.
Sichtbarkeit
The next symbol in the row, a globe, lets you change the visibility of your post.
- Public
Unless you changed it in the settings toots will be public by default. Public means everybody can see your toot on your profile, in public timelines and - if they follow you - in their home timeline. - Unlisted
When you post an unlisted toot everybody can see it on your profile and followers can see it in their home-timelines, but it won't be displayed on public timelines.
People can boost your toot, but the boosted toot will follow the same rules. - Followers-only
Only followers can see that toot on your profile and in their home timelines. The toot can not be boosted. - Direct
A direct message can only be seen by people who are mentioned in it. You can add more than one people to a direct message. If you later on add more people to a direct conversation, they will only see the new messages, since they are mentioned.
Inhaltswarnungen
The last symbol in the row - the cw - stands for content warning. When you click on it a smaller text field will appear above the larger text field.
When you post a toot with a CW people will at first only see what you have written in the smaller text field and have to click to see the larger text.
When you add a picture or video to a toot with a cw then the media will automatically be marked sensitive. You can however click on the checkbox to change that.
Besides warning people about possibly triggers CWs are sometimes also used for jokes - the punchline being hidden.
Suche
You can search for people and hashtags and - on some instances - for posts.
You can find accounts either by searching for their profile name or their display name. To find an account that you have never seen before you have to add the whole handle (@profilename@instance.domain) or the url of the profile.
When you search for a hashtag you'll be shown all hashtags that start with the search phrase you used. So e.g. if you search for "fridays" the results will include "FridaysForFuture", but if you search for "future" they won't.
Ankündigungen
Continuing on the interface in clockwise direction the next function is the announcement display. It is hidden behind the megaphone symbol.
If the instance admin wrote an announcement it will be displayed here. If there is more than one announcement you can click the arrow symbols to see them all.
Once you read all announcements the blue dot on the megaphone symbol will disappear until a new announcement appears.
Home Zeitleisten Einstellungen
Right besides the megaphone symbol there is a settings symbol. Click on it to change what is displayed on your home timeline.
You can hide or show boosts and replies. By default boosts as well as replies will be displayed in your home timeline.
Home Zeitleiste
The home timeline will display posts by users you follow. Depending on what you selected in the settings above it will also display toots someone you follow boosted and replies by people you follow.
What will not be displayed are e.g. replies by people you don't follow on toots by people you follow.
Posts in einer Zeitleiste
Someone boosted
On top of the post will be displayed if this toot was boosted to appear in your timeline and by whom it was boosted.
Time
In the top right corner you'll see the time the toot was posted. If you click on the time the post will open in a new tab.
Hide image
If an image is attached to the post you can hide it and it will be blurred, just like with sensitive media.
Reply
On the bottom the first symbol is the reply button. Click on it to reply to the post.
The person who wrote the toot will automatically be mentioned in your reply. Don't remove that mention, or the person will not be notified of your reply.
Boost
The next symbol is the boost button. Boosting is what retweeting, reblogging or sharing is on other platforms.
So if you click on the button the post will appear in your profile as well as in the home timelines of your followers.
The original author of the toot will be notified that you boosted it.
Like
Liking a post will also notify the author of the toot and - like boosting - the post will show a count of how many times it was liked.
Other than that it has a similar function as bookmarking the toot - you can see all the toots you liked in a separate view.
Expand this post
The following functions can be found in the dropdown menu - the last symbol in the row.
Expanding a post will show it instead of the home timeline (different in extended interface) and display replies underneath it.
You can also get to the expanded view by simply clicking on the post - but make sure you don't click on a mention, hashtag or link.
Copy post url
This function simply copies the direct url of the toot. You can use this to share the toot somewhere else - e.g. in a messenger.
Embed
This function copies the html code that lets you embed the toot on a website.
Bookmark
Bookmarking a toot is like liking it, except the author won't be notified and there is no count of how many times a post was bookmarked.
You can see your bookmarked toots in a separate view than your liked toots.
Mention
This function starts a new post mentioning the author of the toot. This is not like replying as the post you start will not display underneath the authors post.
Direct message
This is like the mention function except the visibility of the started toot will be set to "direct".
Mute, block, report, block domain
See further down
Notifications
Whenever someone interacts with one of your toots or sends you a message you'll be notified.
The notifications button will display a marker if there are unread notifications, unless you changed that in the notification settings
Click on the notifications button to see all notifications instead of the home timeline.
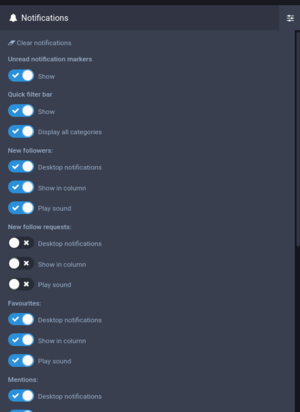
Notification settings
In the top right corner you can change some settings about the notifications.
Clear notifications
This removes all notifications from the view.
You don't need to remove notifications to remove the unread notifications marker though.
Unread notification markers
Select whether to show or hide the unread notifications badge on the notifications button.
Quick filter bar
By default you can choose between all notifications and mentions.
If you hide the quick filter bar you can't choose anymore and will only be shown all notifications.
If you show the quick filter bar and select "display all categories" too, you'll be able to see only relies, only likes, only boosts, only poll results, only updates from people you follow or only new followers.
Desktop notifications
Next you can choose what kind of notification will be displayed for each category.
Desktop notifications are popup notifications on your computer that don't just show up while you are in the browser.
Show in column
Here you can hide notification types from your notifications view. E.g. if you get too many notifications you can hide likes to only see "more important" notifications.
Play sound
This simply changes whether you get a sound notification for each type of notification.
Explore
When you click on explore you'll first see trending posts. These are simply posts a lot of people on your instance like and boost - no sponsored posts or anything. Next you can select "Hashtags" and you'll see trending hashtags. They trend the same way. Then there is "News" which contains trending links and "For you" which contains follow recommendations.
The explore feature may not show much on your instance if the admin(s) are not really behind it, because it takes a lot of moderation effort.
Local timeline
The local timeline displays all toots by people on your instance. Boosts and replies are not shown.
If you are on an instance with a specific theme or for a specific location the local timeline is usually more interesting than on a general purpose instance.
Media only
In the top right corner you can select whether only posts with media attachments will be shown in the local timeline.
Federated timeline
The federated timeline displays toots by everybody who is known to your instance.
Here you can also choose whether to only display toots with media.
Remote only
This option will hide toots from people on your instance from the federated timeline.
Direct messages
Here you'll be shown every direct message you are part of - the ones you sent and the ones you received.
Favorites
Here you'll see every toot you liked starting with your latest like.
Bookmarks
The bookmarks column shows every post you bookmarked.
When you don't want a toot to show up here anymore click on the dropdown menu for the toot and select "remove bookmark".
Lists
Here you can create and view lists.
Lists are timelines containing only toots from people you put on that list.
So e.g. you can create a list of people who post very interesting stuff so you don't miss any of their posts.
A list will only display new posts from users since they were added to the list.
Profile Directory
The profile directory displays new or active users from your instance or from all over.
People can choose not to be displayed in profile directories in the settings.
Preferences
This button takes you directly to the appearance preferences.
Follows and followers
This button takes you to the Follows and followers section of the settings.
Trends
Here you'll see 3 trending hashtags.
You can hide this in the settings and the admin can hide this for everybody on the instance.
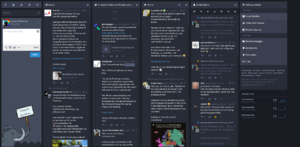
Advanced Interface
You can switch to the advanced interface in the appearance settings.
The advanced interface display more than one column at once. By default it displays the home timeline and the notifications, but you can "pin" the local & federated timeline, the profile directory, direct messages, bookmarks, favorites and lists too.
When you search for a hashtag you can pin that too and then select whether you want to display additional hastags in that timeline and switch between all toots with those hashtags or just local toots.
Profiles
Click on a profile picture to get to the user's profile.
Let's start with your own profile.
Your profile
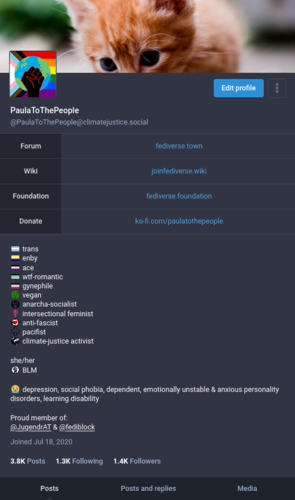
Display name
After your header image and your profile image the first thing from top down is your display name.
The display name is also what's shown prominently on each post. It can, but doesn't have to be the same as the profile name.
You can change the display name in the settings.
Handle
Below the display name you can see your handle. It is @profilename@instance.domain.
Profile fields
Next you can see up to 4 profile fields where you can e.g. display your links. You can add profile fields in the settings.
Profile description
Next is your profile description or bio. Here you can write something about you. You can include emojis, links and hashtags. You can write the bio in the settings
Join date
Underneath your profile description - at least on most instances - you'll see the date you joined that instance.
This is not necessarily the date you joined the Fediverse, as you could have started on another instance.
Even if you move instances this date will not transferred.
Following and follower stats
Next you'll see the number of toots you posted, how many people you follow and how many people follow you.
The number of posts includes replies and non-public posts.
Posts, posts & replies, media
Next you can choose whether below your posts will be shown (starting with your pinned posts), posts and replies or just posts with media.
If you choose media only the media will be displayed in thumbnails. If you click on one of them you'll see the media in large, but still not the post.
Below the media you'll see some buttons - one takes you to the post.
Interactions with your own posts
You can interact with your own posts like with other peoples posts, including replying, liking, boosting, bookmarking and more.
Additionally you can do the following.
Pin on profile
You can pin up to 5 toots on your profile. They will show on top of the other posts.
It's a good idea to pin toots that say something about yourself - like maybe your intro post.
If someone discovers your profile for the first time it might look empty from their point of view of the Fediverse, if it wasn't for your pinned posts. Pinned posts are always discovered with the profile.
Delete
This function is quite self-explanatory. It deletes your post. The post won't be recoverable.
Delete & redraft
Mastodon doesn't have an edit toot feature. What comes closest is delete & redraft.
This deletes the post - all boosts, likes and replies will be gone - and you can edit it to post again.
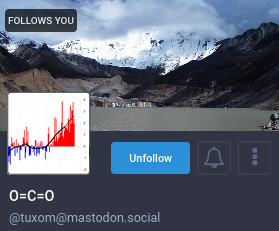
Here we'll go through everything that's different on someone else's profile than on your own.
Follows you
If the user follows you this will be displayed on top of the profile.
Follow/Unfollow
Next you'll see the follow or unfollow button. If you click on follow it might turn into a "cancel follow request" button instead of the unfollow button.
This happens if the other person locked their profile.
Notify me
If you follow the profile you'll see a bell symbol besides the unfollow button. Click on it to receive notifications every time the user toots something.
Mention & direct message
Hide boosts
This will hide boosts by that user in your public timelines. This can be useful if the person toots interesting stuff, but boosts too much uninteresting stuff.
Feature on profile
You can feature other users' profiles on your profile in a separate tab.
They will be displayed as recommendations below your bio.
Add/remove from lists
Here you can add the profile you're looking at directly to a list or to lists or remove them.
Mute
Muting a user means toots by them and toots mentioning them will be hidden, but they can still see your toots and follow you.
You can select whether you still get notifications when the user interacts with you as well as how long the mute should last.
Block
Blocking a user hides their toots and toots mentioning them as well as blocks the user from seeing and interacting with you and your toots.
Report
Reporting a user sends a report to your instance admin and - if you so choose - also to the admin of the instance the user is on.
You can select posts by the user to include in the report and write a bit about why you are reporting them.
Block domain
This blocks not just the user, but the whole instance the user is on. This is e.g. used to fight spam, trolling and harassment by a whole instance.
When you block an instance its usually a good idea to also send a report or a direct message to your instance admin, so they can choose whether to block the domain for everybody on your instance.
Profiles in separate tabs
When you open a profile in a separate browser tab or window there will be more things shown than when you open the profile in the same tab.
E.g. you'll see all the user's toot instead of just the ones known to you.
User's choices
Below the user's bio you'll see other profiles the user chose to feature on their profile.
You can see up to 4 of them. If the user highlights more than 4 then you can reload the tab and see 4 random profiles again.
Featured hashtags
Below the featured profiles you'll see featured hashtags if the user chose some in their profile settings.
Click on one of the hashtags and you'll see all the posts by the user that mention that hashtag.
Instance description and trending now
If you continue further below you'll see an image and a description of the instance the user is on and below that the hashtags that are currently trending on that instance.
Settings
If you go to your settings you'll fist end up in the preferences -> appearance part of the settings, but above that are the profile settings.
Profile settings
Appearance
Display name
Here you can choose the name that will display prominently on your profile and your posts.
A display name can contain spaces and emojis.
Bio
Here you can write a short text about you to tell visitors of your profile who you are.
Header
The header image will only be displayed to people if they visit your profile. It will be displayed on top like a banner.
Avatar
The avatar is your profile image that won't just be displayed on your profile, but also on all your toots.
An avatar can be transparent.
Require follow requests
Choose whether you want everybody to be able to follow you instantly, or whether you want to approve follow requests.
This is a bot account
This option doesn't do much except mark your profile as a bot. This is e.g. chosen if you predominantly crosspost from Twitter or feed your toots from RSS.
Suggest account to others
This option will display your profile in the profile directory and in the follow suggestions.
Profile metadata
Here you can define 4 user fields. Many people use this to link to their homepage(s) or to display their pronouns.
Verification
You can verify a link in your profile fields by adding the rel="me" attribute to a link back from that homepage to your profile.
There is a link that you can just copy and paste on your homepage.
Moving from or to a different account
Moving is explained in this article.
Delete account
If you really don't like mastodon of course you can delete your account. After all you are the owner of your data.
This might not delete all your posts people boosted from those people's profiles.
Featured Hashtags
Here you can select up to 10 hashtags to be displayed on your profile.
Preferences
Appearance
Interface Language
Choose what language Mastodon communicates with you in.
This doesn't affect the posts in your timelines as Mastodon doesn't have a translate feature.
Site Theme
Choose between the standard theme, a high contrast theme and a light theme. The high contrast theme will display links and hashtags in blue.
Enable advanced web interface
Here you can choose between the basic interface and the advanced interface.
Animations and accessibility
Here you can choose whether the timelines will automatically load new toots or not, whether gifs automatically move or not, whether there are animations displayed e.g. for boosting or liking a post, whether you can use swiping motions to interact with Mastodon and whether Mastodon will display it's own fonts or fall back to your system's default fonts.
Crop images in non-expanded posts to 16x9
We recommend unticking this box as toots look better if the whole picture is shown.
Show today's trends
Here you can hide the trending hashtags from your basic or advanced interface.
Confirmation dialogs
These are some good options to avoid unintentionally boosting or deleting a post or unfollowing someone.
Sensitive content
The sensitive content settings let you hide or reveal all media or all media marked as sensitive by the poster.
If you're not easily triggered you can also expand all posts with content warnings so you don't have to click on the content warning every time to see the full toot.
Notifications
Most notification settings were mentioned before so here are options only for email notifications plus options to block all notifications and/or direct messages from people you don't follow or people who don't follow you.
Other
Opt-out of search engine indexing
This will hide your profile from search results on Duck Duck Go, Google and other search engines.
Hide your social graph
Whether your profile displays how many people you follow and how many people follow you.
Group boosts in timelines
This feature is enabled by default. Disabling it may result in your home timeline showing the same post multiple times in a row if many people boosted it.
Posting defaults
Here you can change the default privacy setting for your toots, what language your toots are written in (if you only post in one language) whether all your media is by default marked as sensitive (e.g. if you post a lot of nudes) and whether to disclose what application you are using in your posts. The last option will not do anything if you are just using Mastodon in the browser.
Filter languages
Here you can filter out toots in languages you don't understand. Select the languages you do understand and leave the other boxes unticked.
Follows and followers
Here you can see everybody who follows you, everybody who you follow or every mutual follow.
You can filter by account activity and order by most recent or last active and batch unfollow people.
Filters
Filters let you hide posts based on words or terms included in the posts.
You can e.g. use this to filter out retweets (RT @), words that trigger you or discussions you're simply not interested in.
Automated post deletion
Choose whether old posts of yours are automatically deleted, when they are deleted and what exceptions apply.
Account
Account Settings
Account status
This will usually show "Your account is fully functional". If it doesn't you better contact your instance admin.
Security
You can change your email and password. It is not really recommended to change your password regularly as long as it is a good password and you don't use it on many sites.
Sessions
Here you can see which devices when had last access to your account and under which IP-address.
Below that again are to options to move to and from your account or deleting it.
Two-factor auth
Two-factor authentication is an additional security step to a strong password. You'll be sent messages to your phone containing tokens that you'll need to login to your account.
Authorized apps
Here you'll see which apps are connected to your account. E.g. mobile apps you use on your phone will be displayed here.
When you click on "revoke" you'll be logged out from that app.
Import and Export
You can export the people you follow, your lists, mutes and blocks and your bookmarks.
These can be used to be imported to another profile.
You can also request an archive of your posts and media, but there is no import function for that, so you can't take your posts with you when you move instances.
Invite people
This option is only displayed if your admin allows you to invite people and it only really makes sense if the instance you're on is closed.
You can generate invite links to share with people who can use them to create an account on the same instance.
If you want you can select an option to let everybody who uses your links automatically follow you.
Weiterlesen
- What is the Fediverse?
- Fediverse projects
- What people usually tell you about the Fediverse
- Account creation
- Instances
- Getting started with your Fediverse account
- Moving instances
- Apps
- Best practices
- Frequently Asked Questions
| Navigation bar | ||||||||||||||
|---|---|---|---|---|---|---|---|---|---|---|---|---|---|---|
| About the Fediverse | ||||||||||||||
| 🏠 | 🐎 | 🔠 | 💬 | 👤 | ✏️ | 🚚 | 📱 | 😇 | ❓ | 📍 | 🔗 | |||
| Fediverse projects | ||||||||||||||
| Mastodon Moderation (Mastodon) | ||||||||||||||
| Wiki | More | Editing | ||||||||||||
| ℹ️ | 🗺 | ⌛️ | 🏅 | 🌍 | 📰 | 🛠 | 🔄 | 💢 | 🚧 | ☑️ | 🎮 | |||
